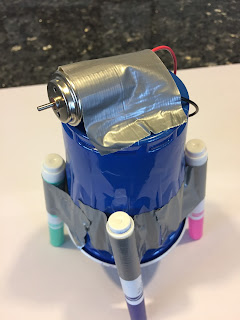
Creating a doodlebot is one of my student's favorite makerspace activities. A doodlebot is a robot that is made from every day materials that draws, or doodles, on it's own. Below are the materials and 10 steps to build a doodblebot.
You will need these supplies to make a doodlebot:
- a large Dixie cup
- 4 markers
- paper to draw on
- duct tape
- a AAA battery pack with exposed wires
- 2 AAA batteries
- a small motor
- red and black wire (with alligator clips or without alligator clips)
- a penny
- wire strippers
- soldering tools (optional)
Step #1 - After you've gathered your materials, tape paper to your table for the doodlebot to try on.
Step #2 - Use duct tape to secure four markers to the outside of an upside down Dixie cup. Be sure they all at the same height and each marker can touch the ground when standing alone.
Step #3 - Get the motor wired. You can find small motors at hobby stores or online. My husband soldered the red and black wires to our motor, and soldered alligator clips to the ends. If you can't solder, you can use wire strippers to expose the ends of the wires and fold them around both metal loop on the motor. Or you can buy wires with alligator clips on both ends. Students can clip one end of a red wire to one of the motor's loops, and clip one end of the black wire to the other motor's loop.
Step #4 - Tape the motor to the top of the Dixie cup, making sure the spinning rod hangs well over the edge of the cup. A weight will need to swing from this rod, so make sure there is ample room for it to swing without the top of the cup creating an obstruction.
Step #5 - Prepare the battery source. I recommend using a AAA battery pack instead of a AA battery pack. I found the AA batteries to run too hot and I've seen it melt the cup - you don't want children to burn themselves! You can find a AAA battery pack at hobby stores or online. Make sure the ends of the wires are exposed. If they aren't, use wire strippers to remove the tips from both the black and red wires. Add the AAA batteries to the battery packs. I've found that children need to be taught how to load batteries, so this step may need to be taught. When the robot fails to draw, incorrect positioning of batteries is often a cause.
Step #6 - Tape the loaded battery pack behind the motor on the top of the Dixie cup.
Step #7 - Tape a penny to the motor's rod. The penny will act as a weight to make the robot vibrate and dance it's way across the paper. This is a tricky step so I included a video to show how it's done. Make sure the secured penny can rotate around the rod without bumping into the top the cup. If it bumps, then your motor will need to be repositioned to allow the penny to rotate without obstruction.
Step #8 - Remove the caps from the bottom of the markers.
Step #9 - Turn on the doodlebot. If you have wires with alligator clips, simply clip the motor wires to the exposed wires on the ends of the battery packs. If you have wires without alligator clips, you'll need to twist the exposed wire ends of the motor to the exposed wire ends of the battery pack. When turned on, the penny should begin to spin like a propeller.
Step #10 - Enjoy watching the doodlebot draw and scribble it's way across the page. To turn the robot off, simply unhook the wire connections.
When I ask my students to create a doodlebot, I give them all the materials and a picture of the end product. Using the picture as a guide, the students need to figure out how to build the robot. The penny can be the trickiest aspect of the doodlebot and the part I help students with the most. I've used this activity successfully with students in grades 2nd-5th.
I hope you found these instructions to make a doodlebot helpful. If you have any questions, feel free to email me at jill.merkle@yahoo.com.


No comments:
Post a Comment